Sunday, February 24, 2008
More Maui photos
I finally had the chance to go back to our photos from our trip to Maui last October and work on the rest of them. I'll split them into two posts and put up the other one in a couple of days. Here we go:

On our last full day on Maui we visited and toured the Maui Tropical Plantation. I told you earlier that there would be a lot of flower photos to come later and I've picked a few of those we took to include here. This photo was taken from the tram ride we took that toured the gardens of the plantation. I think the plants behind the sign are bananas but they might be pineapple. I am not a good plant person.

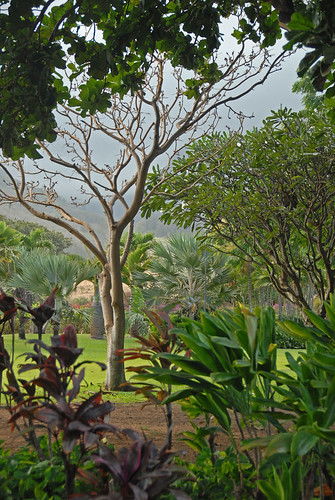
A scene from the gardens. Everywhere you look here was beautiful.

I don't know the name of this one so I just call it a yellow and white flower. There is a look that tropical flowers have that just can't be duplicated here on the mainland with our native plants.

Here is another that I don't know the name of. It looks sort of like a Bird of Paradise but I don't think it is one of those. Let's just call it a red flower.

I am pretty sure this one is a Hibiscus and as I recall it was listed as being a version of the largest of those in the world. It is big.
Another general scene in the gardens. Those are the West Maui Mountains in the background and they were enclosed in mist, like they often are. This is the "Old" mountain range on Maui.

These are coffee beans! You know that I'd know coffee beans. The Maui Tropical Plantation grows and roasts their own coffee and we brought a bag of it home. It is good and very flavorful.
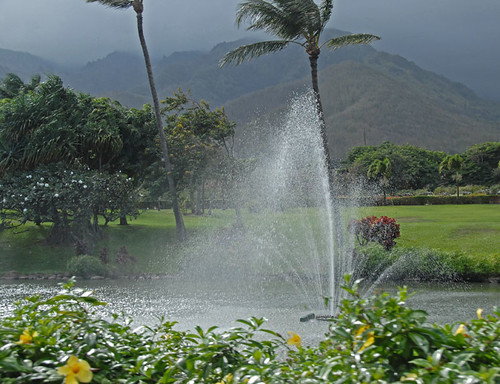
Another general scene taken from the tram and this one shows the mountains more clearly. There were not a lot of ponds on this part of the Island but this one was pretty good sized and had the nice fountain.
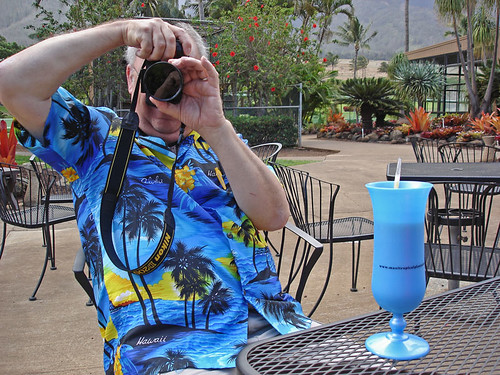
After our tour we took a break and enjoyed a tropical smoothie. While there I took Pat's photo and she took mine as I was taking hers. We brought those plastic glasses home with us on the plane.

Here is my photo of Pat, taken at the same time as the last one posted of me.

This one is a Bird of Paradise. I don't know if they come in different colors or not- I think most of them I saw were this color. But maybe that is only the ones that I recognized as a Bird of Paradise- they may come in all different colors. Anyway, they are kind of unique and pretty.
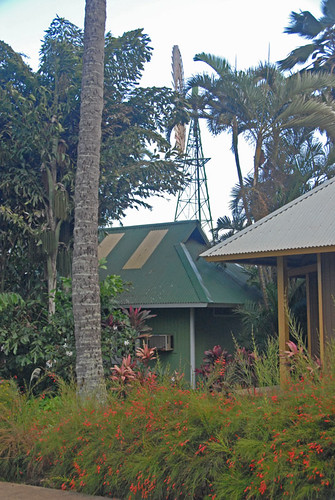
This is my last photo from the Maui Tropical Plantation. It is just a general scene but it does show the tall windmill that seemed to be a working one.
When you next go to Maui I would recommend this place as one to put on your list of places and things to see over there. The food plants are pretty well identified and I am sure most of the employees there could have identified those flowers that I don't know, if I had asked them and written it down. But, even if I don't know what they are, they are still nice to look at. I will have one more post of photos from Maui and have already done the work on them so they are ready to post here. If you want to get a sneak preview, click on one of these photos and go to my Flickr site where they have been uploaded so they are ready to post here. I have also made a set of Hawaii photos there and will soon get them all in the right order.
On our last full day on Maui we visited and toured the Maui Tropical Plantation. I told you earlier that there would be a lot of flower photos to come later and I've picked a few of those we took to include here. This photo was taken from the tram ride we took that toured the gardens of the plantation. I think the plants behind the sign are bananas but they might be pineapple. I am not a good plant person.
A scene from the gardens. Everywhere you look here was beautiful.
I don't know the name of this one so I just call it a yellow and white flower. There is a look that tropical flowers have that just can't be duplicated here on the mainland with our native plants.
Here is another that I don't know the name of. It looks sort of like a Bird of Paradise but I don't think it is one of those. Let's just call it a red flower.
I am pretty sure this one is a Hibiscus and as I recall it was listed as being a version of the largest of those in the world. It is big.
Another general scene in the gardens. Those are the West Maui Mountains in the background and they were enclosed in mist, like they often are. This is the "Old" mountain range on Maui.
These are coffee beans! You know that I'd know coffee beans. The Maui Tropical Plantation grows and roasts their own coffee and we brought a bag of it home. It is good and very flavorful.
Another general scene taken from the tram and this one shows the mountains more clearly. There were not a lot of ponds on this part of the Island but this one was pretty good sized and had the nice fountain.
After our tour we took a break and enjoyed a tropical smoothie. While there I took Pat's photo and she took mine as I was taking hers. We brought those plastic glasses home with us on the plane.
Here is my photo of Pat, taken at the same time as the last one posted of me.
This one is a Bird of Paradise. I don't know if they come in different colors or not- I think most of them I saw were this color. But maybe that is only the ones that I recognized as a Bird of Paradise- they may come in all different colors. Anyway, they are kind of unique and pretty.
This is my last photo from the Maui Tropical Plantation. It is just a general scene but it does show the tall windmill that seemed to be a working one.
When you next go to Maui I would recommend this place as one to put on your list of places and things to see over there. The food plants are pretty well identified and I am sure most of the employees there could have identified those flowers that I don't know, if I had asked them and written it down. But, even if I don't know what they are, they are still nice to look at. I will have one more post of photos from Maui and have already done the work on them so they are ready to post here. If you want to get a sneak preview, click on one of these photos and go to my Flickr site where they have been uploaded so they are ready to post here. I have also made a set of Hawaii photos there and will soon get them all in the right order.
Labels: Flowers, Hawaii, Pat and I, Photos, Trips to see things
Saturday, February 23, 2008
My new extreme wide angle lens
Last weekend I ordered a Tokina 12-24mm F/4.0 AF DX extreme wide angle zoom lens to use on my Nikon D200 Digital SLR camera. It came yesterday from the store in New York and I couldn't wait to test it, so took it outside for a few photos, then a few inside photos including the one here from the sunroom. I didn't have a lot of time to play with it as yesterday was also Pat's birthday and we did have some activities planned.
I love this lens! I didn't realize how much difference I would see between the other lens I have that goes to a wide angle view at 18mm focal length and this one. It doesn't sound like a lot, just 6mm less, but it is a big jump when you look at it from the point of view of percentage change. Anyway, here are three test photos from that short experimental shooting session:
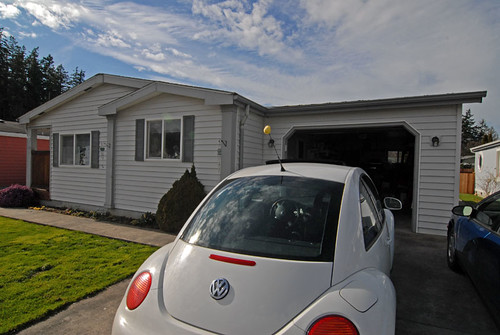
For this photo I was only about two feet from the back of the VW Bug. The view shows from all the way on the left side of the house clear over to the right edge and has most of the Bug in the photo, too. And the vertical lines at the sides are pretty straight up and down. I could have bought a lens that is 2mm wider but it is a Fisheye lens and the verticals at the edges curve. By the time you crop it to fit into a standard view you do not have much more of a wide angle than I have here but you have given up a fair percentage of the pixels in the original image, thus limiting how large you can go with that photo. So, I thought this lens would work better for me and the way I like to take photos. My friend, G, in Fort Bragg, CA has the other lens and I've seen some exciting and different photos he has taken with it. I wonder if I need them both.....
This view shows another corner of the sunroom but it also shows the full length of the house from the back corner of the sunroom all the way to the front, plus the street in front! And it is all sharply in focus, from the nearest thing in the photo, the corner of the sunroom that was about four feet in front of the camera, to the clouds and trees on the hills behind our town. This is another thing that wide angle lenses do, give a vast amount of depth of field where everything is sharp.
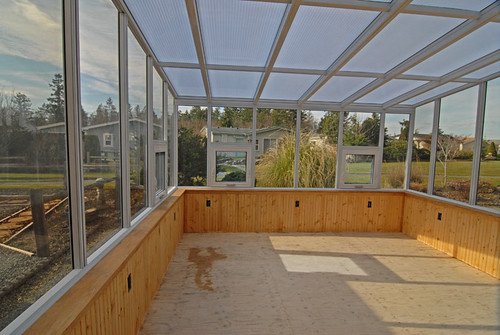
This view inside the sunroom is somewhat similar to others I have posted earlier, taken from the door into the house, but this shows the full left side, all the way across the back and almost up to the sliding glass door on the right side. Notice how much of the ceiling is included. This also shows how a wide angle lens exaggerates perspective, making things look farther apart than they really are. It is only 12 feet to the back of the sunroom from where I took the photo, the same distance that it is across the back of the room, but notice how the wall to the left side looks so much longer than the one across the back. They are the same length.
I think I am going to have a lot of fun with this lens and hopefully get the chance to go out and use it soon. Our weather has been great here for the last week and I hope we have turned the corner to where winter is behind and spring is actually here. But there are things still going on that demand time so I can't just go shooting with the camera. Tomorrow the electrician is coming and I hope we can get the wiring finished in the sunroom. About Monday I can put the final coat of three of Danish oil on the stained wood parts, and then we can setup to have the finished floor put in. We also will go shopping for lights when we look for the flooring. This project may actually be finished within the next two weeks or so!
I did do something else this past week and the thing I ordered should be here Tuesday. That is the same day the guy from Comcast cable TV is coming by to run the cable out to the sunroom. We will soon have HD TV on a much larger screen than the 19" unit I have for the sunroom! More on that later.
I love this lens! I didn't realize how much difference I would see between the other lens I have that goes to a wide angle view at 18mm focal length and this one. It doesn't sound like a lot, just 6mm less, but it is a big jump when you look at it from the point of view of percentage change. Anyway, here are three test photos from that short experimental shooting session:
For this photo I was only about two feet from the back of the VW Bug. The view shows from all the way on the left side of the house clear over to the right edge and has most of the Bug in the photo, too. And the vertical lines at the sides are pretty straight up and down. I could have bought a lens that is 2mm wider but it is a Fisheye lens and the verticals at the edges curve. By the time you crop it to fit into a standard view you do not have much more of a wide angle than I have here but you have given up a fair percentage of the pixels in the original image, thus limiting how large you can go with that photo. So, I thought this lens would work better for me and the way I like to take photos. My friend, G, in Fort Bragg, CA has the other lens and I've seen some exciting and different photos he has taken with it. I wonder if I need them both.....
This view shows another corner of the sunroom but it also shows the full length of the house from the back corner of the sunroom all the way to the front, plus the street in front! And it is all sharply in focus, from the nearest thing in the photo, the corner of the sunroom that was about four feet in front of the camera, to the clouds and trees on the hills behind our town. This is another thing that wide angle lenses do, give a vast amount of depth of field where everything is sharp.
This view inside the sunroom is somewhat similar to others I have posted earlier, taken from the door into the house, but this shows the full left side, all the way across the back and almost up to the sliding glass door on the right side. Notice how much of the ceiling is included. This also shows how a wide angle lens exaggerates perspective, making things look farther apart than they really are. It is only 12 feet to the back of the sunroom from where I took the photo, the same distance that it is across the back of the room, but notice how the wall to the left side looks so much longer than the one across the back. They are the same length.
I think I am going to have a lot of fun with this lens and hopefully get the chance to go out and use it soon. Our weather has been great here for the last week and I hope we have turned the corner to where winter is behind and spring is actually here. But there are things still going on that demand time so I can't just go shooting with the camera. Tomorrow the electrician is coming and I hope we can get the wiring finished in the sunroom. About Monday I can put the final coat of three of Danish oil on the stained wood parts, and then we can setup to have the finished floor put in. We also will go shopping for lights when we look for the flooring. This project may actually be finished within the next two weeks or so!
I did do something else this past week and the thing I ordered should be here Tuesday. That is the same day the guy from Comcast cable TV is coming by to run the cable out to the sunroom. We will soon have HD TV on a much larger screen than the 19" unit I have for the sunroom! More on that later.
Labels: Birthdays, House, Photos, Sunroom
Saturday, February 16, 2008
The sunroom contractor is finished! Finally!!!!!
This sunroom construction project sometimes has felt like it would never be finished, but yesterday The Contractor and his helper finished their part and left our house about 15:00. We have some things to finish including the electrical and the final floor covering in the room, plus some painting and oiling of some of the wood parts. This room was ordered August 25, 2007 and was supposed to be finished by Halloween. It is three and a half months late but I do like it and think we will get a lot of use from it. I do of course have a few more photos to post of the project:
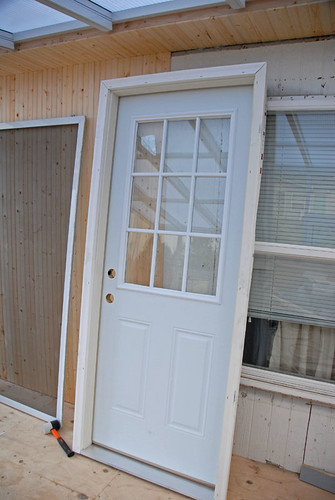
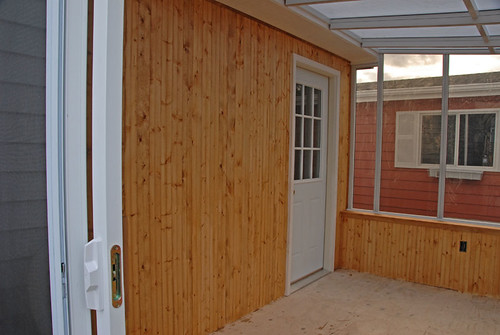
I took this photo while they were working on the room on Valentine's Day. It shows the new door that is to be installed in the wall behind where it is sitting in this photo, where the large window is in the photo. You can see some of the wood planking that is going over the old wall of the house and the same material is on the ceiling of the little brow roof above in the photo. You can also see the screen for the sliding glass door that goes out onto the concrete patio from the sunroom.
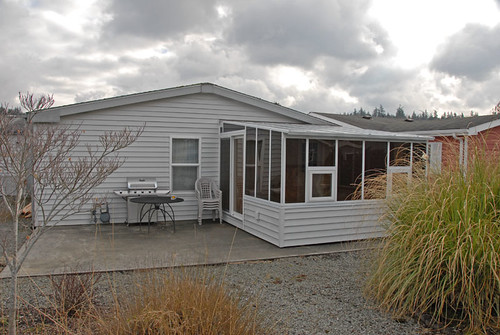
The rest of the photos were taken today. What this one shows is pretty much completed. There is a usable amount of space left on the outside patio that we can enjoy it when the weather is good enough to be outside. It will also give us a nice direct way to get from inside the house to the back yard, through the master bedroom and the door into the sunroom. Before in order to get back here we had to either go through the garage and walk along the north side of the house or out the front door and walk all along the south side. I think the BBQ may get used more often now.
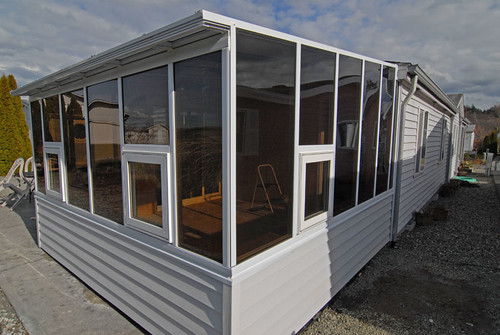
A view looking at the south west corner of the sunroom from the common area behind our neighbors lot. This is a bit of a telephoto shot- it really isn't quite that close to the camera position. They did a pretty good job of picking out new vinyl siding that matched the siding on the house.
The camera is looking toward the original house wall and the new door into the master bedroom, after it was installed. This shows pretty well the tone of the wood on the walls after it was stained and you can see that we decided to paint the ceiling part of the little brow roof at the top of the sunroom wall in white. It seems to look better and matches the overall look of the sunroom ceiling than if it had been stained like the walls. There will be a wall light and an electrical outlet on this wall but they still need to be cut into the wall. And we haven't decided what we want there for a light.
I left this photo in the larger size as I think it will work okay without messing up my blog template and it shows detail better. The roof of the sunroom is a poly carbonate plastic that is divided into four compartments so it is very well insulated. The vertical walls are 1/4" acrylic plastic and not so well insulated but we may add a plastic membrane during the winter. The support structure is aluminum. The knee walls have R19 fiberglas insulation and the floor deck is also insulated with R19 fiberglas. The 3 opening windows and the sliding glass door are all tinted double pane glass. The unit is pretty well insulated.
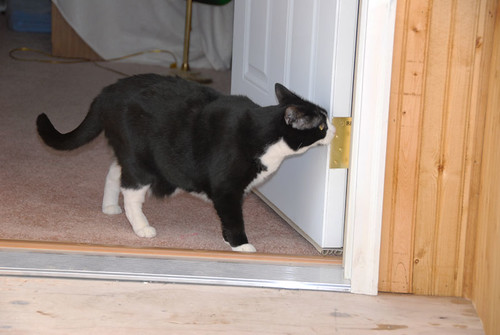
Here is Peewee coming out the new door into the sunroom. She likes it!
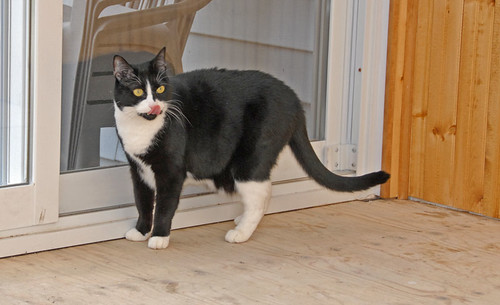
In this photo she looks like she is saying, "Alright, where is my food?"
We actually had some broken sunshine today with outside temperatures that got up to the mid to upper 40s. With the sunroom door closed the inside temp got up to 70. It was very comfortable to be out there working on it and tomorrow is supposed to have even more sunshine and be a bit warmer, too. Peewee likes the room and I think we will too. Now we have to get those window cranks before it really gets warm out there so we can open them for ventilation.
I probably won't be putting more photos of this project up here until we have it all finished. I am setting up a set of photos on my Flickr site and putting them in order so if anyone wants to follow the project through, click on one of the photos here and go there. There will be photos there that I have not posted here.
I took this photo while they were working on the room on Valentine's Day. It shows the new door that is to be installed in the wall behind where it is sitting in this photo, where the large window is in the photo. You can see some of the wood planking that is going over the old wall of the house and the same material is on the ceiling of the little brow roof above in the photo. You can also see the screen for the sliding glass door that goes out onto the concrete patio from the sunroom.
The rest of the photos were taken today. What this one shows is pretty much completed. There is a usable amount of space left on the outside patio that we can enjoy it when the weather is good enough to be outside. It will also give us a nice direct way to get from inside the house to the back yard, through the master bedroom and the door into the sunroom. Before in order to get back here we had to either go through the garage and walk along the north side of the house or out the front door and walk all along the south side. I think the BBQ may get used more often now.
A view looking at the south west corner of the sunroom from the common area behind our neighbors lot. This is a bit of a telephoto shot- it really isn't quite that close to the camera position. They did a pretty good job of picking out new vinyl siding that matched the siding on the house.
The camera is looking toward the original house wall and the new door into the master bedroom, after it was installed. This shows pretty well the tone of the wood on the walls after it was stained and you can see that we decided to paint the ceiling part of the little brow roof at the top of the sunroom wall in white. It seems to look better and matches the overall look of the sunroom ceiling than if it had been stained like the walls. There will be a wall light and an electrical outlet on this wall but they still need to be cut into the wall. And we haven't decided what we want there for a light.
I left this photo in the larger size as I think it will work okay without messing up my blog template and it shows detail better. The roof of the sunroom is a poly carbonate plastic that is divided into four compartments so it is very well insulated. The vertical walls are 1/4" acrylic plastic and not so well insulated but we may add a plastic membrane during the winter. The support structure is aluminum. The knee walls have R19 fiberglas insulation and the floor deck is also insulated with R19 fiberglas. The 3 opening windows and the sliding glass door are all tinted double pane glass. The unit is pretty well insulated.
Here is Peewee coming out the new door into the sunroom. She likes it!
In this photo she looks like she is saying, "Alright, where is my food?"
We actually had some broken sunshine today with outside temperatures that got up to the mid to upper 40s. With the sunroom door closed the inside temp got up to 70. It was very comfortable to be out there working on it and tomorrow is supposed to have even more sunshine and be a bit warmer, too. Peewee likes the room and I think we will too. Now we have to get those window cranks before it really gets warm out there so we can open them for ventilation.
I probably won't be putting more photos of this project up here until we have it all finished. I am setting up a set of photos on my Flickr site and putting them in order so if anyone wants to follow the project through, click on one of the photos here and go there. There will be photos there that I have not posted here.
Labels: House, Our cats, Photos, Sunroom, Weather
Saturday, February 09, 2008
It is almost ready to use
The Contractor spent two and a half days this past week working on our sunroom and is due back today to get most things finished up. It is now fully enclosed with all of the glazing materials in place. There are a few places on the outside that need to be finished including putting 2/3rd of the vinyl siding on the wing walls below the sunroom part of the structure. He said the sealant they sent is the wrong color, a little too yellow to look good on the white of the aluminum so should be bringing that today too. He also found that when the three awning type windows were packed at the factory they forgot to include the cranks that allow the user to open & close them- kind of an important thing for us to have that the company we have had so many problems with, Royal Solariums, Inc. out of Everett, Washington that we bought it from, will have to get for us. Maybe- I don't have any faith left in them.
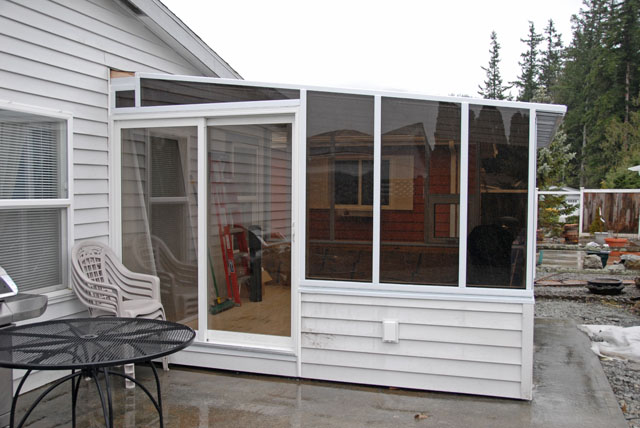
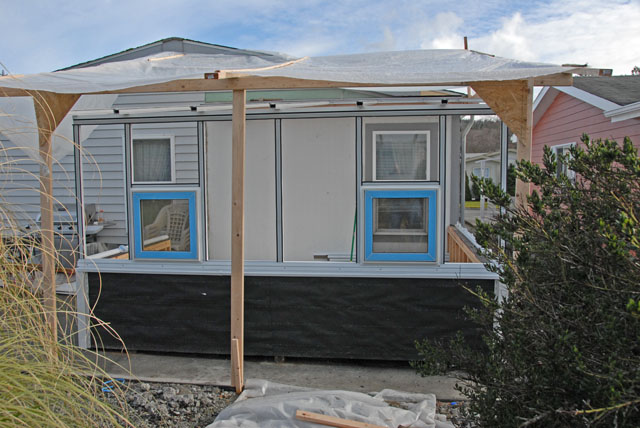
This photo shows the "front" of the structure, if you define the front as where the door to enter it from the outside patio is located. The vinyl siding is in place here but it needs to be washed. There is a fairly large area at the top where the room joins the house (see the wood in the photo) that needs to be covered and The Contractor said he would bring aluminum to cover that and about the same place on the other side. I want to also build a small step to place outside the entrance door as the rise of that step into the building is higher than is comfortable. I'll build that myself. This is the north side so it will rarely get any sunshine directly on it but it does give us a way to get to the patio and back yard without having to go through the garage or walk completely along the side of the house, and that will be handy and appreciated.
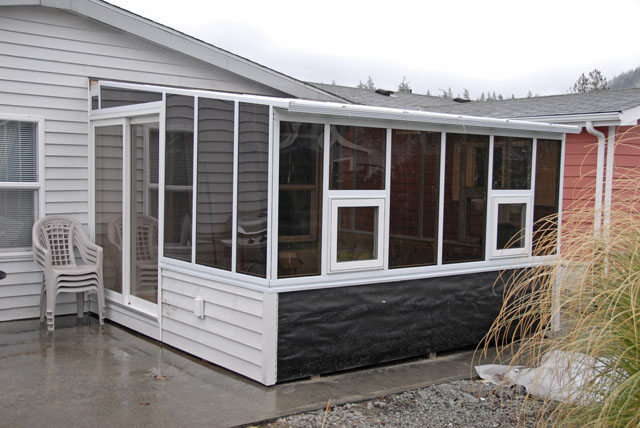
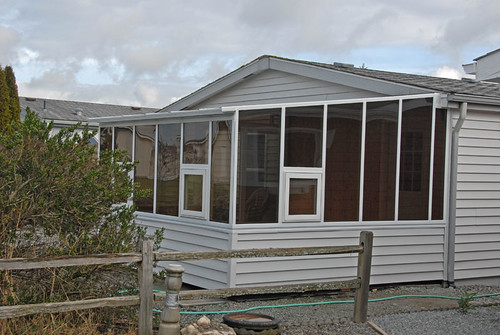
This view shows the north and west sides of the sunroom and how it joins the original house as well as how it sits on the concrete patio. It covers a little less than half of the width of the patio so that space will also be usable and easy to access from the sunroom through the large (and heavy!) sliding glass door. The type of windows we had installed allow them to be open for ventilation and still keep rain from coming inside and since we do get rain here in the northwest I think that will be handy. If Royal Solariums ever gets the missing cranks to us. We look in the photos to be pretty close to our neighbors back yard and we actually are but a cedar fence is part of the planned landscaping to do in our yard this spring and summer and that will make more of a visual divider between the yards than the split rail fence that is there now.

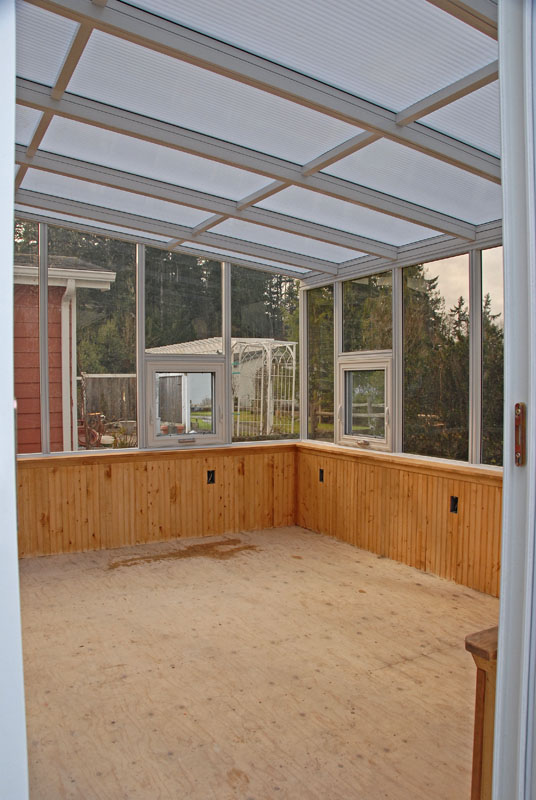
Here is the inside of the sunroom taken from about where a person would stand coming out the door from our bedroom into it. You can see a bit of moisture that is still on the floor from where rain water leaked under the plastic The Contractor put on the deck to protect it until it was covered. He thinks the rain came through the nail holes in the plastic where the wing walls were fastened onto the deck. The good news is that it doesn't look like there was enough to soak the insulation that is inside the deck. The wiring in those wing walls needs to be finished today, then he has to put the rest of the insulation in them as well as the little brow roof he built that the sunroom attaches to and finish the inner sides of them. Then there is trim to put in and the big job for today, putting the door that goes into the bedroom in. The other two wing walls need vinyl siding to be put in place on the outside and some trim out there as well as the missing caulking. There is really quite a long list of "little" things to get done.
I know he wanted to be able to finish it today. He planned to be back yesterday afternoon, stay overnight in a hotel and then get it done today. He didn't show up yesterday. He doesn't work on Sundays so it really wouldn't surprise me if he doesn't show up today but I sure hope he comes Monday to get us finished up. This project that was supposed to be finished by last Halloween has been dragging on way too long. We at times felt sorry for The Contractor out there working in the cold and rain, but if it had been built when it was supposed to have been he would have been working in much nicer weather. And then we would have been able to use it over the months since Halloween. Wish us luck!
Edited: Saturday, 11:00 A.M. He is here! The Contractor showed up just a few minutes after I posted this post originally. He doesn't have the door that goes from the house into the sunroom but will be back with it on Tuesday, plan to stay overnight that night and get it installed and the other things finished up then. Today he should be able to get a lot of those little things wrapped up. Maybe this project is finally going to get finished. Except for those d#%& handles for the windows and who knows how long it may take Royal Solariums to come through with them!
This photo shows the "front" of the structure, if you define the front as where the door to enter it from the outside patio is located. The vinyl siding is in place here but it needs to be washed. There is a fairly large area at the top where the room joins the house (see the wood in the photo) that needs to be covered and The Contractor said he would bring aluminum to cover that and about the same place on the other side. I want to also build a small step to place outside the entrance door as the rise of that step into the building is higher than is comfortable. I'll build that myself. This is the north side so it will rarely get any sunshine directly on it but it does give us a way to get to the patio and back yard without having to go through the garage or walk completely along the side of the house, and that will be handy and appreciated.
This view shows the north and west sides of the sunroom and how it joins the original house as well as how it sits on the concrete patio. It covers a little less than half of the width of the patio so that space will also be usable and easy to access from the sunroom through the large (and heavy!) sliding glass door. The type of windows we had installed allow them to be open for ventilation and still keep rain from coming inside and since we do get rain here in the northwest I think that will be handy. If Royal Solariums ever gets the missing cranks to us. We look in the photos to be pretty close to our neighbors back yard and we actually are but a cedar fence is part of the planned landscaping to do in our yard this spring and summer and that will make more of a visual divider between the yards than the split rail fence that is there now.
Here is the inside of the sunroom taken from about where a person would stand coming out the door from our bedroom into it. You can see a bit of moisture that is still on the floor from where rain water leaked under the plastic The Contractor put on the deck to protect it until it was covered. He thinks the rain came through the nail holes in the plastic where the wing walls were fastened onto the deck. The good news is that it doesn't look like there was enough to soak the insulation that is inside the deck. The wiring in those wing walls needs to be finished today, then he has to put the rest of the insulation in them as well as the little brow roof he built that the sunroom attaches to and finish the inner sides of them. Then there is trim to put in and the big job for today, putting the door that goes into the bedroom in. The other two wing walls need vinyl siding to be put in place on the outside and some trim out there as well as the missing caulking. There is really quite a long list of "little" things to get done.
I know he wanted to be able to finish it today. He planned to be back yesterday afternoon, stay overnight in a hotel and then get it done today. He didn't show up yesterday. He doesn't work on Sundays so it really wouldn't surprise me if he doesn't show up today but I sure hope he comes Monday to get us finished up. This project that was supposed to be finished by last Halloween has been dragging on way too long. We at times felt sorry for The Contractor out there working in the cold and rain, but if it had been built when it was supposed to have been he would have been working in much nicer weather. And then we would have been able to use it over the months since Halloween. Wish us luck!
Edited: Saturday, 11:00 A.M. He is here! The Contractor showed up just a few minutes after I posted this post originally. He doesn't have the door that goes from the house into the sunroom but will be back with it on Tuesday, plan to stay overnight that night and get it installed and the other things finished up then. Today he should be able to get a lot of those little things wrapped up. Maybe this project is finally going to get finished. Except for those d#%& handles for the windows and who knows how long it may take Royal Solariums to come through with them!
Labels: Griping, House, Photos, Sunroom
Sunday, February 03, 2008
Peewee and the Sunroom
Our cat Peewee loves to lie right on top of the heat registers of the forced air heating system in our house. She also likes to be close to Pat so when we are in the computer room she would latch onto the one register that is in that room. We recently got a new table for Pats side of the room that her printer sits on and it covers Peewees register. Plus, there is a shelf down low on that table to both give support and give us a place to store printing paper, etc. The vertical support for the table cuts across the middle of the heat vent and the shelf has only 4 1/2 inches of space below it, so poor Peewee has been trying to figure out how to get onto HER register. This shows her latest and, so far, most successful attempt:
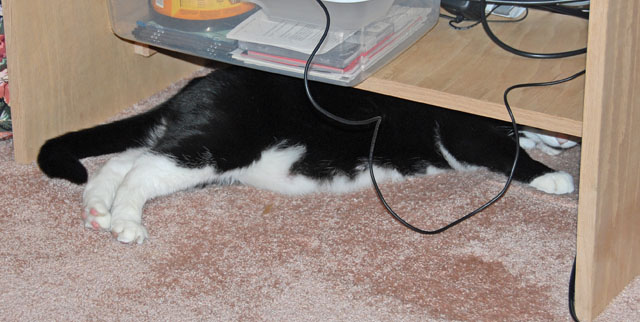
I think I had gotten her attention just before I took this photo as she raised her head to look out, so you can see her pink nose near the right side of the photo just below the shelf. Silly kitty.
The Contractor came back Thursday afternoon and also worked all day on Friday. Earlier in the week it was clear but cold and now after he has shown up the rains started again. Pretty hard rain. On Thursday they (he brought his 17 year old son along to help) got some of the aluminum supports for the sunroom fastened onto the knee wall. In the morning on Friday they got the part of the house roof overhang cut away that needed to be cut into in order to add the little roof across the back of the house that the sunroom will attach to.
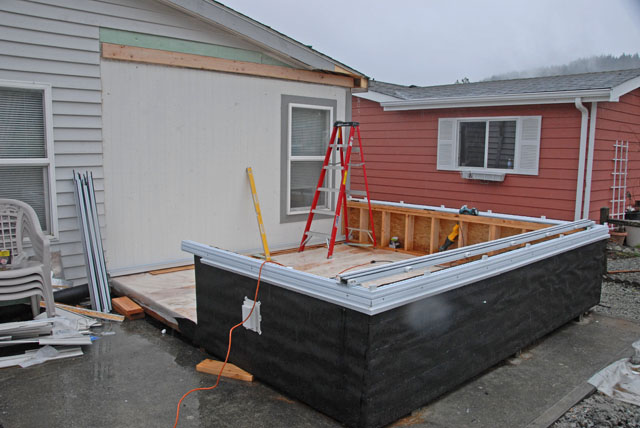
This shows the first of the aluminum supports in place and the header for the little roof, with the older part cut away.
But then they decided to go get some 2X4s and plastic sheeting to build a tent over the whole thing. I wish they had done this sooner since some of the wood decking of the floor has gotten wet, even though it was covered in plastic. This photo shows a pretty good view of the 2X4s and tent and how far they got on the aluminum studs and rafters. This photo was taken on Saturday in the sunshine, while they are not here working of course, but it does show how far they did get on Friday. This view is from the back of our yard looking toward the house. Two of the awning windows are in place between wall studs. The bright blue on them is just a covering to protect the white vinyl while the construction is going on. They also have the vinyl corner pieces in place on the knee wall. It will be sided in the same vinyl siding as is on the rest of the house.
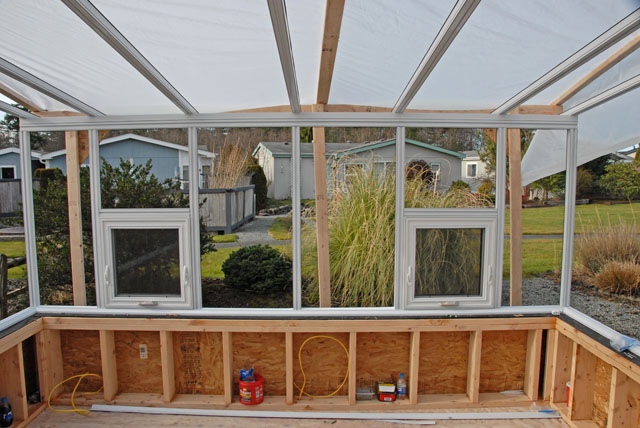
I took this photo with my back up against the house and looking out through the sunroom toward the back yard. You can see the windows in place and in fact can pretty well see how their glass is tinted. It is easiest to notice in the right side window if you compare the green fonds of the Pampas Grass plant as seen through the glass to that part of the plant to the left of the window. All of the vertical glazing will be tinted like this. I think this spring we will add a fence around at least the back yard, so there will be a cedar fence about six feet tall that will run across the yard at about the end of the crushed rock path that heads toward the common area yard beyond the edge of our lot. There will be a gate in the fence there so we can come & go into the common area yard.
This view also shows a bit of our community. The gazebo where our wedding ceremony occurred is just to the right of the area shown in this photo and the clubhouse is just beyond that gazebo. We are a gated community of 120 mobile or manufactured homes but all are mounted on foundations so they sit on the ground like a stick built house rather than up in the air three feet or so like mobile homes are often sited. The landscaping in the park is nice and all places have to be well maintained. I'm not used to living in a place where we have to ask permission to do something like building this sunroom, but this is one of those places. There are advantages and disadvantages to that kind of restrictions. But for us now, we are just glad that The Contractor has been showing up pretty regularly and that this project should (maybe) be finished before too long. He should be back on Tuesday and work all next week on our project. It is probably good that we didn't go to Arizona this weekend!
I think I had gotten her attention just before I took this photo as she raised her head to look out, so you can see her pink nose near the right side of the photo just below the shelf. Silly kitty.
The Contractor came back Thursday afternoon and also worked all day on Friday. Earlier in the week it was clear but cold and now after he has shown up the rains started again. Pretty hard rain. On Thursday they (he brought his 17 year old son along to help) got some of the aluminum supports for the sunroom fastened onto the knee wall. In the morning on Friday they got the part of the house roof overhang cut away that needed to be cut into in order to add the little roof across the back of the house that the sunroom will attach to.
This shows the first of the aluminum supports in place and the header for the little roof, with the older part cut away.
But then they decided to go get some 2X4s and plastic sheeting to build a tent over the whole thing. I wish they had done this sooner since some of the wood decking of the floor has gotten wet, even though it was covered in plastic. This photo shows a pretty good view of the 2X4s and tent and how far they got on the aluminum studs and rafters. This photo was taken on Saturday in the sunshine, while they are not here working of course, but it does show how far they did get on Friday. This view is from the back of our yard looking toward the house. Two of the awning windows are in place between wall studs. The bright blue on them is just a covering to protect the white vinyl while the construction is going on. They also have the vinyl corner pieces in place on the knee wall. It will be sided in the same vinyl siding as is on the rest of the house.
I took this photo with my back up against the house and looking out through the sunroom toward the back yard. You can see the windows in place and in fact can pretty well see how their glass is tinted. It is easiest to notice in the right side window if you compare the green fonds of the Pampas Grass plant as seen through the glass to that part of the plant to the left of the window. All of the vertical glazing will be tinted like this. I think this spring we will add a fence around at least the back yard, so there will be a cedar fence about six feet tall that will run across the yard at about the end of the crushed rock path that heads toward the common area yard beyond the edge of our lot. There will be a gate in the fence there so we can come & go into the common area yard.
This view also shows a bit of our community. The gazebo where our wedding ceremony occurred is just to the right of the area shown in this photo and the clubhouse is just beyond that gazebo. We are a gated community of 120 mobile or manufactured homes but all are mounted on foundations so they sit on the ground like a stick built house rather than up in the air three feet or so like mobile homes are often sited. The landscaping in the park is nice and all places have to be well maintained. I'm not used to living in a place where we have to ask permission to do something like building this sunroom, but this is one of those places. There are advantages and disadvantages to that kind of restrictions. But for us now, we are just glad that The Contractor has been showing up pretty regularly and that this project should (maybe) be finished before too long. He should be back on Tuesday and work all next week on our project. It is probably good that we didn't go to Arizona this weekend!
Labels: Our cats, Photos, Sunroom, Weather, Wedding
![]()
